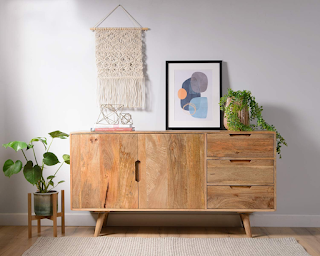
DIY Sideboard Woodworking Plans for Modern Homes
This comprehensive guide provides detailed woodworking plans for constructing a stylish and functional sideboard, perfectly suited for the modern home. The project is designed to be achievable for intermediate-level woodworkers with access to standard woodworking tools. The plans emphasize clean lines, minimalist aesthetics, and durable construction, resulting in a piece that seamlessly integrates into contemporary living spaces. This guide will cover material selection, cutting lists, assembly techniques, finishing processes, and potential modifications to personalize your sideboard.

I. Material Selection and Preparation
A. Choosing the Right Wood
The choice of wood significantly impacts the final appearance and durability of your sideboard. Hardwoods are generally preferred for their strength, stability, and ability to accept finishes. Popular options include:
- Maple: Offers a clean, light-colored aesthetic with a fine grain, ideal for modern designs.
- Walnut: Provides rich, dark tones and a luxurious feel, creating a striking statement piece.
- Cherry: Presents warm reddish-brown hues that deepen with age, adding character to the sideboard.
- Birch: A versatile option with a relatively light color and straight grain, suitable for various staining techniques.
Consider the desired aesthetic and budget when selecting your wood. Ensure the wood is properly dried to reduce the risk of warping or cracking during and after construction. Kiln-dried lumber is recommended for this project.
B. Cutting List and Material Quantities
The following cutting list assumes a sideboard with the following dimensions: 60 inches (width) x 18 inches (depth) x 30 inches (height). Adjust these dimensions as needed to suit your space and preferences. Remember to account for kerf (the width of the cut made by the saw blade) when calculating your dimensions. This example uses ¾-inch thick lumber.
- Side Panels (2): 29 ½ inches (H) x 18 inches (W)
- Top Panel (1): 60 inches (W) x 18 inches (D)
- Bottom Panel (1): 60 inches (W) x 18 inches (D)
- Shelf (1): 58 inches (W) x 16 inches (D)
- Front/Back Rails (2): 58 inches (W) x 4 inches (H)
- Divider (Optional, for drawers): Dimensions depend on drawer design. Calculate based on drawer width and spacing.
- Legs (4): Dimensions dependent on desired leg style and height. Consider tapered or straight legs.
- Hardware: Wood screws, dowels, wood glue, finish.
C. Preparing the Wood
Before beginning assembly, carefully inspect all lumber for defects. Plane or sand any uneven surfaces to ensure a smooth finish. Joint the edges of the boards that will be joined edge-to-edge to guarantee a tight fit. This preparation significantly improves the quality and structural integrity of the finished product.
II. Assembly Process
A. Constructing the Side Frames
Begin by assembling the side frames, which consist of a side panel, a front rail, and a back rail. Use wood glue and dowels for robust joining. Pre-drill pilot holes to prevent wood splitting. Clamp the assembly until the glue is dry, ensuring squareness and alignment. Repeat this process for the second side frame.
B. Attaching the Top and Bottom Panels
Once the side frames are assembled and dry, attach the top and bottom panels. Again, use wood glue and dowels for strength. Ensure the panels are flush with the sides and aligned accurately. Clamp firmly to allow the glue to cure completely. For larger panels, consider using additional support during clamping to prevent warping.
C. Adding the Shelf
The shelf is installed between the side frames, providing additional storage space. Install shelf supports (either dadoes cut into the side frames or shelf pins) before positioning the shelf. Ensure the shelf sits level and is securely fastened.
D. Integrating Drawers (Optional)
If you choose to add drawers, carefully plan their dimensions and positioning. Install drawer slides according to the manufacturer's instructions. Construct the drawers using rabbet and dado joints or dovetail joints for a more advanced approach. Ensure the drawers slide smoothly and fit snugly.
E. Attaching the Legs
Once the main structure is complete, attach the legs. The method will depend on the leg style and desired appearance. You can use wood screws, dowels, or even mortise and tenon joints. Ensure the legs are securely fastened and are plumb (perfectly vertical).
III. Finishing Touches
A. Sanding and Refinement
After assembly, thoroughly sand the entire sideboard, starting with coarser grit sandpaper and progressing to finer grits. This process removes any imperfections and creates a smooth surface for finishing. Pay particular attention to corners and edges.
B. Applying the Finish
The choice of finish depends on your desired aesthetic and the type of wood used. Options include:
- Oil-based finishes: Offer excellent protection and enhance the natural grain of the wood.
- Water-based finishes: Are less toxic and have a faster drying time.
- Polyurethane: Provides a durable, hardwearing finish, resistant to scratches and water damage.
Apply the finish according to the manufacturer's instructions, usually in multiple thin coats. Sand lightly between coats to achieve a smooth, even finish. Allow ample drying time between coats.
C. Adding Hardware (Optional)
If desired, install knobs or pulls on the drawers and doors. Choose hardware that complements the overall design of the sideboard. Ensure the hardware is properly attached and functions smoothly.
IV. Modifications and Personalization
These plans provide a foundation for a modern sideboard. Consider these modifications to personalize your project:
- Altered Dimensions: Adjust the width, depth, and height to fit your specific needs and space.
- Different Leg Styles: Explore various leg designs, such as tapered legs, hairpin legs, or pedestal bases.
- Additional Shelving: Incorporate extra shelves for increased storage capacity.
- Inlay or Veneer: Add decorative elements through inlay or veneer to create visual interest.
- Cabinet Doors: Instead of drawers, incorporate cabinet doors for a different storage solution.
Remember to adjust the cutting list and assembly process accordingly when making modifications.
By following these detailed plans and taking the time to carefully execute each step, you can create a beautiful and functional DIY sideboard that will be a cherished addition to your modern home for years to come. Enjoy the process and the satisfaction of crafting a unique piece with your own hands.