DIY Sideboard Furniture Plans for Every Room

DIY Sideboard Furniture Plans for Every Room

The sideboard, a versatile and often overlooked piece of furniture, offers unparalleled storage and stylistic potential for any room in the home. Its adaptability extends beyond the traditional dining room, finding a comfortable place in living rooms, hallways, bedrooms, and even home offices. This comprehensive guide provides detailed plans and considerations for crafting your own bespoke sideboard, tailored to the specific needs and aesthetic of each space.

Designing the Perfect Sideboard: Considerations for Each Room

Before embarking on the construction process, careful consideration of the room's purpose and existing décor is crucial. The design and functionality of your sideboard should seamlessly integrate with its surroundings, enhancing the overall ambience.

The Dining Room Sideboard: A Culinary Companion

The dining room sideboard traditionally serves as a storage solution for dinnerware, silverware, linens, and other dining essentials. Functionality is paramount. Consider incorporating features such as:

  • Deep drawers for linens and placemats.
  • Adjustable shelves to accommodate varying sized dishes and serving platters.
  • Cutlery trays for organized silverware storage.
  • A wine rack or dedicated liquor storage compartment.
  • A surface area sufficiently large for displaying serving dishes or decorative items.

Aesthetically, a classic and elegant design complements most dining room styles. Consider using rich wood tones like mahogany or cherry, or opt for a painted finish in a neutral color to match your existing décor. Incorporate detailed molding and hardware to enhance its visual appeal.

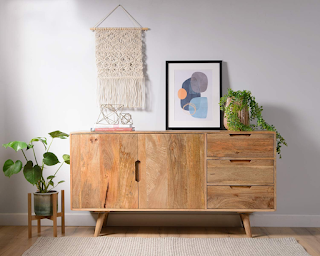
The Living Room Sideboard: Entertainment Central

In the living room, the sideboard transforms into an entertainment hub. Its primary purpose shifts towards media storage and display. Functionality here should prioritize:

  • Open shelving for media consoles, gaming systems, and decorative items.
  • Closed cabinets for concealing wires and remotes, maintaining a clean and organized appearance.
  • Drawers for storing gaming accessories, DVDs, or board games.
  • Consideration of cable management solutions to keep wires concealed and organized.
  • Ample surface space for a television or other display devices.

Aesthetically, the living room sideboard can be more contemporary or eclectic in design. Modern materials like metal or glass can be incorporated, alongside wood, to create a visually interesting piece. Consider a sleek minimalist design or a more rustic, reclaimed wood look, depending on your existing style.

The Bedroom Sideboard: A Storage Sanctuary

The bedroom sideboard provides a discreet and stylish storage solution, freeing up valuable closet space. Functionality in this context focuses on:

  • Drawers of varying depths for clothing, accessories, and linens.
  • A top surface for a lamp, alarm clock, or decorative items.
  • Potential integration of a built-in mirror for added convenience.
  • Closed cabinets for concealing less frequently used items.
  • Internal dividers within drawers for better organization.

Aesthetically, the bedroom sideboard should complement the overall bedroom design. Opt for a calming color palette and soft materials. Consider a minimalist design with clean lines or a more ornate piece depending on your preferred style. The use of soft lighting on the sideboard can enhance its visual appeal and create a relaxing ambiance.

The Hallway Sideboard: A Welcoming Entryway

In the hallway, the sideboard becomes a functional and decorative element, offering storage and a welcoming atmosphere. Functionality is key:

  • Closed storage for shoes, coats, and other items.
  • Open shelves for keys, mail, or decorative objects.
  • A surface for placing items upon entry, such as bags or mail.
  • Potential inclusion of a small built-in seating area for added comfort.
  • Consideration of the hallway's width and traffic flow when determining the sideboard's dimensions.

Aesthetically, consider a design that complements the overall style of your home's entryway. A simple and elegant design prevents the hallway from feeling cluttered. Choose materials and colors that create a welcoming and inviting atmosphere.

The Home Office Sideboard: A Productive Haven

In a home office, the sideboard transforms into a practical storage and workspace solution. Functionality should prioritize:

  • Drawers for storing stationery, documents, and office supplies.
  • Closed cabinets for concealing printers, scanners, and other equipment.
  • Open shelving for displaying books, files, or decorative items.
  • Sufficient surface area for writing, working on a laptop, or setting up a small work station.
  • Consideration of ergonomic factors, ensuring comfortable access to stored items and the work surface.

Aesthetically, opt for a design that promotes productivity and a sense of organization. Choose materials and colors that create a calming and efficient work environment. A clean, minimalist design can help minimize distractions and improve focus.

Construction Techniques and Materials

The construction of your DIY sideboard will depend on your chosen design and the level of your woodworking skills. From simple designs using readily available materials to more complex projects requiring specialized tools and techniques, careful planning is paramount. Consider using:

  • Solid wood: Offers durability and a timeless aesthetic. Options include oak, maple, cherry, or pine.
  • Plywood: A cost-effective alternative providing excellent stability. Consider using Baltic birch for superior quality.
  • MDF (Medium-Density Fiberboard): A smooth, paintable surface ideal for contemporary designs. Requires careful sealing to prevent moisture damage.
  • Hardware: Choose high-quality hinges, drawer slides, and knobs or handles to ensure longevity and smooth functionality.

Construction techniques may involve basic joinery such as dadoes and rabbets, more advanced methods like dovetail joints, or even simpler methods using screws and wood glue. Always ensure proper assembly and finishing techniques to create a durable and aesthetically pleasing piece.

Finishing Touches: Enhancing the Aesthetic

The finishing touches can significantly impact the overall look and feel of your sideboard. Careful consideration of the finish and hardware will elevate your creation from a functional piece to a statement piece of furniture.

  • Staining and sealing: Enhance the natural beauty of wood with a variety of stains and sealants. Consider oil-based or water-based finishes depending on your preference.
  • Painting: Offers a wide range of color options and can create a contemporary or classic look. Use high-quality paint designed for furniture.
  • Hardware: Choose knobs, handles, and hinges that complement the overall design. Consider using antique or modern styles to match your aesthetic.
  • Optional additions: Incorporate features such as decorative molding, routed edges, or inlaid details to further personalize your sideboard.

With careful planning, thoughtful design, and meticulous execution, your DIY sideboard project will not only fulfill a practical need but will also serve as a testament to your creativity and craftsmanship, becoming a cherished piece in your home for years to come.

Share:

Woodworking Plans for Custom Buffets and Dining Room Furniture

Building Your Dream Dining Room: Custom Buffet and Furniture Plans

Hey there, fellow woodworking enthusiasts! So you're dreaming of a stunning, custom-built dining room, huh? Something that truly reflects your style and craftsmanship? That's awesome! Building your own buffet and dining room furniture is a rewarding project, even if it seems a bit daunting at first. This guide is here to walk you through the process, offering tips, tricks, and a sprinkle of inspiration along the way. We'll tackle planning, design, and construction, breaking it all down into manageable chunks.

Planning Your Perfect Dining Room Set

Before you even think about grabbing your saw, let's get the planning phase nailed down. This is crucial for avoiding costly mistakes and ensuring your furniture fits perfectly in your space.

Measuring Your Space:

Grab your tape measure and get to work! Accurate measurements are absolutely essential. Measure the length and width of your dining area, noting any obstacles like doorways, windows, or radiators. Consider the walkway space you'll need around the table and buffet. Don't forget to account for the height of your ceilings!

Choosing a Style:

What kind of vibe are you going for? Modern minimalist? Rustic farmhouse? Elegant Victorian? Browse online for inspiration, check out furniture catalogs, and maybe even visit a few furniture stores to get a feel for what you like. Having a clear style in mind will greatly influence your design decisions. Think about the overall aesthetic of your home and how the new furniture will complement it.

Material Selection:

This is where things get exciting! What type of wood are you drawn to? The options are endless – oak, cherry, walnut, maple, pine... each with its own unique grain, color, and characteristics. Think about the durability and maintenance requirements of each wood type, especially considering its location in a high-traffic area like a dining room. Consider the budget too! Some woods are significantly more expensive than others.

Functionality First:

How will you use your buffet and dining table? Do you need extra storage space in the buffet? How many people do you typically seat for dinner? These practical considerations should guide your design choices. A large family might need a larger table, while a smaller space might benefit from a more compact design. Think about features like drawers, shelves, and wine racks for the buffet. For the table, consider leaves for expanding its size when needed.

Designing Your Custom Buffet

Now for the fun part – designing your masterpiece! Let's focus on the buffet first.

Sketching and Planning:

Start by sketching out your ideas on paper. Don't worry about being an artist; rough sketches are fine. Consider the overall dimensions, the number of doors and drawers, and the placement of any decorative elements. You can use simple boxes to represent drawers and cabinets. Include measurements for clarity.

Detailed Drawings:

Once you have a basic sketch you like, create more detailed drawings. These should include precise measurements for each component, detailing the dimensions of the doors, drawers, shelves, and the overall casework. You can use graph paper to make this easier.

Choosing Hardware:

The hardware can make or break the look of your buffet. Choose knobs, pulls, and hinges that complement your chosen style and wood. Consider the material, finish, and size of the hardware. Don't underestimate the impact of small details!

Construction Techniques:

Decide on your construction method. Will you use traditional joinery (dovetails, mortise and tenon)? Or will you rely on more modern techniques like pocket screws or dowels? Consider your skill level and the tools you have available. Traditional joinery is stronger but requires more skill and precision. Pocket screws offer speed and convenience, although they might be less aesthetically pleasing depending on the design.

Designing Your Custom Dining Table

Let's move onto the centerpiece of your dining room – the table itself!

Table Shape and Size:

Consider the shape – rectangular, round, oval, or square. The shape will influence the seating arrangement and the overall feel of the room. A round table promotes conversation, while a rectangular table is more formal. The size, as mentioned earlier, is critical and directly tied to the number of people you need to seat comfortably.

Tabletop Construction:

How will you construct the tabletop? Will it be a single slab of wood, or will you use multiple boards joined together? Consider the wood's width and thickness to minimize warping and ensure stability. A wide tabletop might require more support, such as aprons or stretchers.

Base Design:

The table base is just as important as the tabletop! There are countless options – pedestal bases, four-legged bases, trestle bases, and more. The base should be proportionally sized to the tabletop and complement the overall design. Consider the style and complexity of the base design—a simple base can be more elegant than an overly ornate one.

Building Your Furniture: A Step-by-Step Approach

With your plans finalized, it's time to get your hands dirty! This is where the real woodworking magic happens. Remember to take your time, follow your plans carefully, and don't be afraid to ask for help if you get stuck. Many online forums and communities are dedicated to woodworking, offering support and advice. Each piece of furniture will require careful attention to detail, and patience is key for a quality final product.

This step will vary significantly depending on your design choices, so it's essential to research the specific techniques needed for each element of your project (e.g., building drawers, applying a finish). Many excellent woodworking books and online tutorials can guide you through each process.

Finishing Touches

Once your buffet and table are assembled, it's time to add the finishing touches. This is where you'll really make your pieces shine.

  • Sanding: Thoroughly sand all surfaces to achieve a smooth, even finish.
  • Finishing: Apply your chosen finish – stain, paint, varnish, or a combination – according to the manufacturer's instructions.
  • Hardware Installation: Install the knobs, pulls, and hinges.
  • Final Inspection: Carefully inspect your work for any imperfections and make any necessary repairs.

Commonly Asked Questions

Q: What tools do I need for this project?

A: The specific tools will depend on your design and construction methods, but you'll likely need basic woodworking tools like a saw (circular saw or hand saw), drill, sander, clamps, measuring tape, and various hand tools. Always prioritize safety when using power tools.

Q: How long will this project take?

A: This highly depends on your experience level, the complexity of your design, and the time you can dedicate to the project. A simple buffet and table might take a few weeks, while a more intricate design could take several months.

Q: Can I adjust the plans to fit my skills?

A: Absolutely! These are guides, not rigid rules. Feel free to adjust the design and construction methods to match your skill level and comfort. It's better to start with a simpler design and gradually increase the complexity as your skills improve.

Q: What if I make a mistake?

A: Don't worry, mistakes happen! Woodworking is a learning process. Try to learn from your mistakes, and don't be afraid to start over if necessary. Many times, small imperfections can be easily fixed with sanding and refinishing.

Happy building! Remember to enjoy the process and the satisfaction of creating something beautiful and functional with your own two hands. Let me know if you have any more questions!

Share:

Beginner Woodwork Projects for a Quick and Rewarding Start

Jumpstart Your Woodworking Journey: Easy Projects for Beginners

So, you're captivated by the artistry and satisfaction of woodworking, but the sheer volume of possibilities feels overwhelming? Don't worry! Starting your woodworking adventure doesn't require years of experience or a massive workshop. This guide provides a curated selection of beginner-friendly projects that deliver quick wins, boosting your confidence and igniting your passion for this rewarding craft. These projects require minimal tools and readily available materials, allowing you to dive in headfirst and experience the joy of creating something beautiful with your own hands.

Simple & Stylish Coasters

Coasters are a fantastic entry-level project. They're small, manageable, and perfect for practicing basic techniques like cutting, sanding, and finishing. Choose a visually appealing wood like cherry, maple, or even reclaimed wood for a unique touch. You can achieve a sophisticated look with simple square or round shapes, or get creative with more intricate designs using jigsaws or even hand-cutting. Remember to sand your coasters thoroughly to a smooth finish before applying a protective coat of varnish or oil to prevent water damage. This project teaches you fundamental skills like measuring, cutting accurately, and appreciating the beauty of natural wood grain.

Materials You'll Need:

  • Wood (e.g., 1/2-inch thick hardwood scraps)
  • Jigsaw or hand saw
  • Sandpaper (various grits)
  • Wood finish (varnish or oil)
  • Measuring tape and pencil

A Charming Wooden Box

Building a small wooden box is a step up in complexity, introducing you to more advanced joinery techniques like basic butt joints. Start with a simple design, perhaps a square or rectangular box, using readily available wood. You can enhance the box's aesthetic appeal with contrasting wood types or by adding decorative elements like brass hinges or a simple latch. The process involves cutting the wood to precise dimensions, assembling the pieces with wood glue and clamps, and meticulously sanding before applying a finish. This project reinforces your understanding of measuring, cutting, and assembling wood pieces, while also introducing you to the satisfaction of creating a functional piece.

Essential Tools & Materials:

  • Wood (e.g., pine or basswood)
  • Wood glue
  • Clamps
  • Hand saw or miter saw
  • Sandpaper
  • Wood finish
  • Optional: Brass hinges and latch

Rustic Key Holder

A rustic key holder is both practical and aesthetically pleasing. This project lets you experiment with different wood types and finishes, adding personal touches. You can create a simple design using a single piece of wood, drilling holes for the keys, or craft a more elaborate design by adding a small shelf or hooks. The focus here is on sanding for a smooth, comfortable grip and applying a protective finish to enhance the wood's natural beauty and durability. This project hones your skills in drilling, sanding, and creating a functional item that's also a charming addition to any home.

Get Started With These:

  • Piece of wood (approximately 1-inch thick)
  • Drill with various drill bits
  • Sandpaper
  • Wood finish
  • Screws (if adding hooks or a shelf)

Remember to always prioritize safety when working with woodworking tools. Wear appropriate safety glasses and follow instructions carefully. Embrace the learning process, don't be afraid to make mistakes, and enjoy the incredible satisfaction of crafting something beautiful from raw materials. These projects are merely a starting point; your creativity and woodworking skills will undoubtedly grow with each new creation.

Share:

Custom Aquarium Furniture for Creating a Beautiful Display Piece

Transform Your Aquarium into a Stunning Showpiece with Custom Furniture

Aquariums are more than just homes for fish; they're captivating underwater worlds that can become breathtaking focal points in any room. But a standard aquarium stand often fails to do justice to the beauty within. Elevate your aquatic display to a whole new level by investing in custom aquarium furniture. This allows you to perfectly integrate your aquarium into your existing décor, creating a truly unique and stunning feature.

Designing Your Dream Aquarium Furniture

Designing custom aquarium furniture offers unparalleled flexibility. You're not limited to standard sizes and styles. Instead, you collaborate with designers and craftspeople to create a piece that perfectly complements your home's aesthetic and your aquarium's specific needs. Imagine a sleek, modern stand crafted from polished walnut, seamlessly integrated with a built-in lighting system. Or perhaps you envision a rustic, reclaimed-wood piece that evokes the natural beauty of your aquarium's inhabitants. The possibilities are endless.

Material Selection: A Foundation of Style and Durability

The choice of material significantly impacts the overall look and feel of your custom furniture. Solid hardwoods like oak, mahogany, or cherry offer exceptional durability and timeless elegance. Engineered wood provides a more budget-friendly option while still delivering a beautiful finish. For a more contemporary feel, consider materials such as high-gloss lacquer or sleek metal accents. Remember to consider the weight of your fully-filled aquarium; a sturdy base is crucial for safety and longevity.

Incorporating Practical Features

Beyond aesthetics, consider the practical aspects. Think about incorporating features that enhance both the functionality and visual appeal of your setup. These could include:

  • Hidden storage for aquarium equipment, cleaning supplies, and food.
  • Integrated lighting, perfectly positioned to highlight your aquatic landscape.
  • Custom-cut shelving to display aquatic decorations, books, or other related items.
  • Cable management systems to keep wires neatly concealed.

These thoughtful additions ensure that your custom aquarium furniture is not only beautiful but also highly functional.

Collaborating with Professionals: From Concept to Completion

Creating truly bespoke aquarium furniture requires a collaborative approach. Work closely with a skilled carpenter, cabinetmaker, or interior designer who understands the unique requirements of aquarium installations. Discuss your vision in detail; provide them with the dimensions of your aquarium, your preferred style, and any specific features you desire. They can guide you through material selection, design options, and the overall construction process. Don't hesitate to share inspiration photos or mood boards to help communicate your ideas effectively.

Ensuring Stability and Safety

The weight of a filled aquarium is substantial. Safety is paramount. Your custom-designed stand must be exceptionally strong and stable. Discuss the load-bearing capacity with your craftsman, ensuring the design can comfortably handle the combined weight of the aquarium, water, substrate, and inhabitants. Proper bracing and reinforcement are crucial for preventing accidents.

The End Result: A Captivating Focal Point

The culmination of your efforts is a truly unique and captivating centerpiece for your home. Your custom aquarium furniture transforms your aquarium from a simple fixture into a stunning work of art, seamlessly integrated into your living space. It showcases your aquatic world in the most flattering light, enhancing the beauty of your fish and plants while adding an element of sophistication and personal style to your home.

Share:

DIY Woodwork Project Plans for Every Skill Level

DIY Woodwork Project Plans for Every Skill Level

Hey there, fellow woodworkers! Whether you're a seasoned pro wielding a router like a magic wand or a complete newbie just eyeing up that dusty old toolbox, I've got some awesome DIY woodwork project plans for you. We'll cover everything from super simple projects perfect for beginners to more challenging creations that will really test your skills. So grab your favorite beverage, get comfy, and let's dive into the world of wood!

Beginner-Friendly Projects (No Experience Needed!)

If you're just starting out, it's all about building confidence and getting familiar with basic tools. Don't worry about creating museum-quality masterpieces just yet – focus on having fun and learning the ropes. These projects are designed to be easy, forgiving, and super satisfying to complete.

Simple Wooden Coasters

This is a perfect first project! All you need are some square tiles of wood (you can buy pre-cut pieces at most craft stores), sandpaper, wood stain or paint, and a sealant. Sand down the edges, apply your chosen finish, and let it dry. Bam! You've got stylish coasters to protect your furniture. You can even get creative with designs – burnt designs, painted designs, or just leave them natural.

A Rustic Key Holder

Another great beginner project! Find a nice piece of reclaimed wood (or a new one, it's your project!). Use screws or nails to attach some hooks (S hooks work great!). You can sand it down, stain it, or leave it natural. This project is quick, easy and instantly useful. You'll be so proud of yourself once you're able to hang your keys on your beautifully crafted key holder!

A Basic Wooden Box

This one takes a little more precision, but it's still totally manageable for beginners. You'll learn how to cut wood accurately and assemble pieces using wood glue and small nails or screws. Simple mitered corners are perfect for this project. You can make it as big or small as you like, and it's great for storing small items. Don't worry about making it perfect; the imperfections add to the charm!

Intermediate Projects (Some Experience Required)

Okay, you've tackled a few beginner projects, you're feeling confident, and ready to take on something a little more challenging. These projects introduce more complex techniques and require a bit more precision.

A Small Bookshelf

Building a bookshelf is a classic woodworking project. It allows you to practice measuring, cutting, and assembling more complex pieces. A simple design with three shelves is a great starting point. This will teach you about wood joinery and how to build a sturdy structure.

A Wooden Cutting Board

Making a cutting board is a fun way to combine functionality with creativity. You'll learn how to work with different types of wood, choose the right type of finish for food safety, and create a beautiful kitchen accessory. Use food-safe oil and make sure to choose a wood that is suitable for cutting. There are many tutorials out there to help you along the way!

A Simple Birdhouse

This project is perfect for practicing your joinery skills. You'll need to create accurately sized pieces to fit together perfectly. This allows for some creative freedom in design and is a rewarding project that will attract birds to your garden. Remember to think about the size and species of bird you'd like to attract when designing your birdhouse!

Advanced Projects (For Experienced Woodworkers)

Ready for a real challenge? These projects require advanced woodworking skills, precision, and a good understanding of various techniques. Get ready to flex those woodworking muscles!

A Full-Size Bookshelf

Stepping up from the intermediate bookshelf, this project requires more intricate design and construction techniques. Consider incorporating things like dovetail joints for a truly impressive finish. This is a really satisfying project once completed, and it will be a beautiful piece of furniture in your home.

A Custom-Built Table

Designing and building a table, whether it's a coffee table, dining table, or something else entirely, is a significant undertaking. You'll need to plan the design carefully, ensuring stability and functionality. This project allows for a high degree of customization, allowing you to create a truly unique piece of furniture. You'll be able to show off your advanced skills and create something truly special.

A Detailed Wooden Toy

Creating an intricate wooden toy, such as a rocking horse or a detailed car, takes patience, precision, and a high level of skill. This project is a great way to show off your skills and create a truly special gift for a child (or yourself!). You'll be able to choose from many different designs – the possibilities are endless!

Commonly Asked Questions

Q: What tools do I need to get started?

A: For beginner projects, you'll mainly need a saw (hand saw or jigsaw), sandpaper, wood glue, clamps, and possibly a drill. As you progress, you may want to invest in more advanced tools like a router, planer, and various chisels.

Q: Where can I find wood?

A: Most hardware stores and lumber yards sell wood. You can also find reclaimed wood at salvage yards or online marketplaces.

Q: What type of wood should I use?

A: It depends on the project. Pine is a good, inexpensive choice for beginners. Hardwoods like oak and maple are more durable but more expensive.

Q: What about safety?

A: Safety is paramount! Always wear safety glasses and a dust mask. Use the right tools for the job and take your time. Don't rush the process.

Q: Where can I find more project plans?

A: There are countless resources online and in books for woodworking plans. Sites like Pinterest, Instructables, and YouTube are great starting points.

Happy woodworking, everyone! Remember to always prioritize safety and have fun with it. The joy of creating something with your own hands is truly rewarding.

Share:

Craft a Timeless Chest with These Durable Woodworking Plans

Crafting a Timeless Chest: Durable Woodworking Plans

This comprehensive guide details the construction of a robust and aesthetically pleasing wooden chest, designed for longevity and heirloom status. The plans presented emphasize traditional joinery techniques and the selection of durable hardwoods, ensuring a piece capable of withstanding the test of time. Each step is carefully outlined, providing both the experienced woodworker with a refined approach and the novice with a structured learning experience.

I. Material Selection and Preparation

The foundation of any successful woodworking project lies in the quality of materials employed. For this timeless chest, we recommend selecting hardwoods known for their strength, durability, and aesthetic appeal. While personal preference plays a role, options such as oak, walnut, cherry, or mahogany are excellent choices. The specific dimensions of the chest can be tailored to individual needs, but the following plans assume a chest approximately 36 inches wide, 18 inches deep, and 24 inches high.

A. Lumber Selection and Milling

Quantities will vary depending on chosen dimensions. This plan assumes the use of 1-inch thick lumber. You will require:

  • Four side pieces (approximately 24 inches tall x 18 inches wide)
  • Two end pieces (approximately 24 inches tall x 36 inches wide)
  • One bottom piece (approximately 36 inches wide x 18 inches deep)
  • Two lid pieces (approximately 36 inches wide x 12 inches deep) (Consider using two thinner boards joined for added strength and to accommodate wood movement)
  • Appropriate lengths of wood for framing the lid (approx. 36 inches long, quantity dependent on chosen frame design)
  • Wood for the chest's frame (consider the same wood as the chest's sides, at least 1-1.5 inches thick, quantity depending on design)
  • Wood for the hinges and latches (choose a durable, preferably matching hardwood or metal)

Before commencing construction, each board should be carefully planed and jointed to ensure flat, square surfaces. This precision is crucial for achieving tight joints and preventing structural instability. Consider using a thickness planer and jointer for optimal results. All lumber should be thoroughly dried to reduce the risk of warping or cracking later.

B. Hardware Selection

The longevity of the chest also hinges on the quality of its hardware. Invest in durable hinges, latches, and possibly a lock. Consider the overall aesthetic of the chest when choosing hardware finishes. Heavy-duty, wrought-iron hinges would complement a rustic design, while elegantly crafted brass hinges would suit a more refined style. The choice of latches and locks should be equally considered, focusing on sturdiness and ease of use.

II. Constructing the Chest Body

The chest's body is constructed using robust joinery techniques to ensure structural integrity. Mortise and tenon joints are highly recommended for their strength and elegant appearance. Alternatively, strong and precisely cut butt joints reinforced with wood screws and glue can provide a viable, albeit slightly less visually appealing, option for less experienced woodworkers.

A. Cutting Mortises and Tenons (Preferred Method)

This method involves creating precisely sized mortises (recesses) in the end pieces and matching tenons (projections) on the side pieces. The mortises are typically cut using a mortise chisel, while the tenons can be created with a hand saw or a tenon saw. Precise measurements and careful execution are crucial for achieving a tight, stable fit. Use a marking gauge to ensure accurate mortise placement.

B. Assembling the Chest Body

Once the mortises and tenons are cut, apply a high-quality wood glue to the tenons and carefully fit them into the mortises. Use clamps to hold the pieces firmly in place while the glue dries completely. Allow ample drying time, as specified by the glue manufacturer. After the glue has set, you can further secure the joints with wooden dowels for added strength.

C. Attaching the Bottom

The bottom of the chest can be attached using either rabbet joints, dadoes, or simply screwing it from the inside, ensuring a tight and flush fit with the body. A rabbet joint, where a groove is cut into the chest's sides and the bottom is fitted into this groove, offers a particularly strong and aesthetically pleasing solution.

III. Creating and Attaching the Lid

The chest's lid should be crafted with equal care to ensure both functionality and aesthetics. A well-made lid will enhance the chest's overall appeal and longevity.

A. Constructing the Lid Frame

A frame around the lid provides additional strength and enhances the finished appearance. The frame can be constructed using traditional miter joints reinforced with corner blocks or biscuits. Ensure that the frame sits flush with the lid panels. This frame will serve as the attachment point for the hinges.

B. Attaching the Lid Hinges

Select robust hinges suitable for the weight and size of the lid. The hinges should be securely fastened to both the lid frame and the top edge of the chest. Ensure that the hinges allow the lid to open and close smoothly and that the lid sits level when closed.

IV. Finishing Touches

Once the chest is assembled, it requires finishing to enhance its appearance and protect the wood. This involves sanding, applying a suitable finish, and installing the latches and any desired locks.

A. Sanding and Finishing

Begin by sanding the entire chest, starting with coarser grit sandpaper and gradually moving to finer grits for a smooth surface. Apply a finish that is appropriate for the type of wood and desired level of protection. Options include oil-based finishes, varnish, shellac, or polyurethane. Multiple coats may be needed to achieve a desired level of protection and sheen.

B. Installing Hardware

Finally, install the latches and locks. Ensure that they are securely fastened and function properly. A well-placed and functioning latch enhances both security and the aesthetic integrity of the design.

V. Conclusion

By following these detailed plans and utilizing quality materials and techniques, you can create a timeless wooden chest that will serve as a functional and beautiful piece for generations to come. Remember that careful planning and meticulous execution are key to achieving a high-quality result. The satisfaction of crafting such a durable and aesthetically pleasing piece is a reward in itself, leaving a legacy far beyond its simple functionality.

Share:

Crafting Simple and Safe Children’s Woodworking Projects

Sparking Creativity: Simple & Safe Woodworking Projects for Kids

Hey there, parents and crafty caregivers! Are you looking for fun activities that combine learning and creativity? Woodworking might just be the perfect answer! It's amazing how much kids can learn and accomplish with a little guidance and the right tools. This guide is all about making woodworking safe and enjoyable for little ones, focusing on projects that are manageable and rewarding. Forget the complex designs – we're diving into simple projects that will build confidence and a love for crafting.

Choosing the Right Tools and Materials

Safety first! That's the golden rule when it comes to woodworking with kids. Before you even think about hammering, let's talk about the tools and materials you'll need. Forget power tools for now; we're keeping things completely manual and kid-friendly.

Essential Tools:

  • Kid-safe work gloves: These protect tiny hands from splinters and scrapes.
  • Soft wood: Balsa wood, basswood, or pine are excellent choices because they are soft and easy to work with.
  • Wood glue: Opt for a non-toxic, child-safe variety.
  • Small hammer (child-sized): Make sure it's lightweight and designed for little hands. Avoid metal hammers.
  • Sandpaper (various grits): Start with coarser sandpaper to remove rough edges and finish with finer sandpaper for a smooth surface.
  • Measuring tape/ruler: Teach your child how to measure accurately, even if it's just "this long."
  • Pencil: For marking the wood.
  • Safety glasses (for you and the child): Always protect your eyes!

Remember, supervision is key. Always be present while your child works with the tools, guiding them and ensuring they use the tools correctly.

Simple Woodworking Projects for Beginners

Now for the fun part! Here are some easy and rewarding projects perfect for young woodworkers:

1. Miniature Wooden Blocks:

This is a great starting point. Cut softwood into small, manageable squares or rectangles. Let your child sand the edges to smooth them out. This helps them develop fine motor skills and an understanding of surface texture. You can even let them decorate the blocks with paint or crayons afterwards!

2. Simple Wooden Puzzles:

Cut a larger piece of softwood into simple shapes – a square, a circle, a triangle. Then, using a saw (adult-supervised, of course), create slots to fit interlocking pieces. This teaches shape recognition and spatial reasoning.

3. Decorated Wooden Coasters:

Cut squares of wood into coaster size. Sand them down smoothly. Let your child unleash their creativity by painting, decorating, or even adding small, safe embellishments like buttons or beads (make sure they are securely glued). These make lovely gifts, too!

4. Name Tags or Bookmarks:

Cut out small rectangles of wood. Help your child sand the edges, then let them decorate the tags with paint, markers, or stencils. They can use their own names or decorate the bookmarks with favourite characters or themes. This project helps them practice writing skills as well.

5. Wooden Animal Shapes:

This project is more challenging, and you might need to pre-cut the shapes based on templates to get you started. Use wood glue to attach smaller pieces for tails, ears, or legs. Your child can then sand and paint them to create adorable animals.

Tips for a Safe and Enjoyable Woodworking Experience

Here are some essential safety and fun tips to make your woodworking sessions successful:

  • Start small and simple: Don't overwhelm your child with complex projects. Begin with easy tasks to build their confidence.
  • Work in a well-ventilated area: Woodworking can produce dust, so it's important to have good air circulation.
  • Clean up thoroughly: Always put away tools and materials after each session to prevent accidents.
  • Make it a collaborative effort: Work alongside your child, guiding them and offering encouragement.
  • Focus on the process, not just the product: The goal is to have fun and learn, not to create a perfect masterpiece.
  • Celebrate your child's creations: Show your appreciation for their hard work and creativity.
  • Teach them about tool safety: Always emphasize the importance of handling tools with care.
  • Dress appropriately: Long sleeves and pants are recommended to minimize the chance of injuries.

Commonly Asked Questions

Here are some frequently asked questions to help you prepare for your woodworking adventures:

Q: What kind of glue is best for kids' woodworking projects?

A: Look for non-toxic, water-based wood glue specifically designed for children's crafts. Many craft stores carry this type of glue.

Q: My child is very young. Are there any projects suitable for toddlers?

A: Yes! Toddlers can participate in simpler projects like decorating pre-cut wooden shapes with paint or stickers. Always supervise closely and focus on the sensory experience and creative expression.

Q: What if my child gets a splinter?

A: Tweezers and antiseptic wipes are a must-have in your woodworking kit. Remove the splinter carefully and clean the area to prevent infection.

Q: How do I dispose of wood scraps and sawdust safely?

A: Sweep up sawdust carefully and dispose of it in a sealed bag. Larger wood scraps can often be reused in future projects or responsibly disposed of according to local regulations.

Q: My child is afraid of using tools. How can I encourage them?

A: Start with very simple tasks and let them gradually get used to the tools. Positive reinforcement and encouragement are key. Focus on the fun aspects of crafting and building. Show them examples of their age group's successful woodworking and celebrate every little achievement!

Remember, woodworking with children is all about having fun and fostering creativity. So, grab your tools, gather your materials, and get ready for some fantastic crafting adventures!

Share:

DIY Aquarium Furniture for Crafting the Perfect Fish Tank Setup

DIY Aquarium Furniture: Crafting the Perfect Fish Tank Setup

Forget generic aquarium stands! Elevate your fishkeeping experience by building custom furniture that perfectly complements your tank and home décor. This guide empowers you to create stunning, functional, and unique pieces, saving you money while showcasing your creativity. We'll walk you through the design process, material selection, and construction techniques, transforming your fish tank from a simple fixture into a captivating centerpiece.

Designing Your Dream Aquarium Stand

Before grabbing your tools, meticulously plan your design. Consider the size and weight of your aquarium—a larger tank demands a more robust structure. Measure your tank's dimensions precisely, adding extra space for equipment like filters and heaters. Sketch your design, noting the desired height, width, and depth. Think about the overall style: a rustic wooden stand, a sleek modern design, or perhaps a whimsical, handcrafted piece. Will it feature shelves for storage? Drawers for supplies? Integrated lighting? The possibilities are endless! Remember to account for weight distribution and stability; you want a sturdy stand that can safely support your full aquarium setup, including water, substrate, decorations, and fish.

Choosing the Right Materials

Material selection significantly impacts the stand's durability and aesthetics. Solid wood, such as oak or pine, offers strength and a classic look, but requires careful sealing to prevent water damage. Plywood is a more affordable option, providing excellent strength-to-weight ratio. Ensure you choose a waterproof or water-resistant grade (like marine-grade plywood) for long-lasting performance. Metal, like steel or aluminum, provides exceptional strength but requires careful finishing to prevent rust and corrosion. For a truly unique look, consider combining materials, like using wood for the frame and metal for accents. Always select materials capable of handling the considerable weight of a full aquarium.

Construction Techniques and Essential Tools

Once your design is finalized and materials are gathered, you'll need the right tools. This includes a measuring tape, saw (circular saw or jigsaw, depending on your materials), drill, screwdriver, sandpaper, wood glue, screws, and appropriate finish (paint, stain, varnish). For metal construction, you might need a welder, cutting tools, and appropriate metal finishes. Begin by cutting your chosen material according to your design specifications. Precise cuts are crucial for a sturdy and aesthetically pleasing result. Assemble the frame using wood glue and screws, ensuring all joints are secure and level. Consider using corner braces for extra reinforcement, particularly for larger and heavier tanks. Sand all surfaces smooth before applying your chosen finish. Remember safety first! Always wear appropriate safety glasses and a dust mask when cutting and sanding.

Adding Finishing Touches

After construction, personalize your stand. Apply a protective finish – a waterproof varnish is ideal for wood, while metal requires a rust-resistant paint. Add functional features like shelves for books, decorative elements, or even built-in lighting. You can incorporate subtle LED lighting under the tank to highlight the aquatic display. Use high-quality casters for easy mobility if desired. Take your time, focusing on details to achieve a professional-looking finish. Consider adding a backsplash to prevent water damage from splashes or spills.

Beyond the Stand: DIY Aquarium Canopies and Backgrounds

Expand your DIY creativity beyond the stand! Construct a canopy to house lighting and equipment, hiding them neatly from view. Consider building a custom aquarium background, adding depth and visual interest to the tank. Use foam board, paint, and other materials to create a realistic underwater scene. This personalized touch will truly make your aquarium setup stand out. The possibilities are endless!

Creating your own aquarium furniture offers a deeply satisfying experience, allowing you to craft a truly unique and personalized setup for your aquatic companions. With careful planning and execution, you'll create a stunning and functional centerpiece that reflects your personal style.

Share:

Baby Furniture Plans for Safe and Charming Nursery Creations

Baby Furniture Plans for Safe and Charming Nursery Creations

The creation of a nursery is a joyous undertaking, filled with anticipation and the desire to craft a space that is both safe and aesthetically pleasing for the newest member of the family. Central to this endeavor is the selection and, ideally, the construction of baby furniture. This comprehensive guide delves into the essential considerations for designing and building safe and charming nursery furniture, emphasizing practicality, durability, and adherence to stringent safety standards.

Designing for Safety: Paramount Considerations

Prioritizing safety in baby furniture design is non-negotiable. Every aspect, from material selection to structural integrity, must be carefully scrutinized to mitigate potential hazards. Failing to adhere to safety regulations can lead to serious injury or even fatality. Therefore, thorough planning and meticulous execution are paramount.

Material Selection: Prioritizing Non-Toxicity and Durability

The materials used in baby furniture construction should be inherently non-toxic and resistant to damage. Avoid using paints, stains, or finishes containing lead, volatile organic compounds (VOCs), or other harmful substances. Opt for water-based, low-VOC paints specifically designed for children's furniture. Similarly, consider using solid hardwoods like maple or cherry, known for their durability and resistance to wear and tear. These materials are less susceptible to chipping or splintering, minimizing the risk of injury to the infant.

Structural Integrity and Stability: Preventing Tipping and Collapse

The structural integrity of the furniture is crucial for preventing tipping or collapse. Cribs, in particular, must meet stringent safety standards to ensure stability. This includes the use of appropriate hardware and robust joinery techniques. Avoid using weak or unreliable connections that could compromise the structure's stability. For cribs, ensure that the mattress fits snugly to prevent suffocation hazards. Consider anchoring heavier pieces of furniture, such as dressers and changing tables, to the wall to further prevent tipping incidents.

Edge and Corner Safety: Minimizing Sharp Edges and Protrusions

Sharp edges and corners pose a significant risk to infants and toddlers. Therefore, all edges and corners of the furniture should be rounded or otherwise softened to minimize the risk of injury. Avoid any protrusions or sharp points that could snag clothing or cause injury during play. The use of protective edge guards can also enhance safety, particularly on older pieces of furniture that might not meet contemporary safety standards.

Hardware and Fasteners: Ensuring Secure Attachments

All hardware and fasteners should be securely attached and out of reach of the child. Use high-quality screws, bolts, and other fasteners that are appropriately sized for the furniture's construction. Avoid using small parts that could easily be detached and swallowed by a young child. Regularly inspect the hardware to ensure that all fasteners remain secure and that no parts are missing or damaged.

Charming Design Elements: Aesthetics and Functionality

While safety is paramount, the aesthetic appeal of the nursery furniture should not be overlooked. A well-designed nursery can create a calming and stimulating environment for the baby. Careful consideration should be given to the overall style, color palette, and functionality of the furniture.

Style and Aesthetics: Creating a Harmonious Nursery

The style of the baby furniture should complement the overall design scheme of the nursery. Consider the existing décor and choose furniture that fits harmoniously within the space. Whether it's a modern, minimalist aesthetic or a more traditional, ornate style, ensure that the furniture reflects the parents' preferences and creates a welcoming atmosphere. The use of soft colors, natural materials, and gentle curves can contribute to a calming and soothing environment.

Color Palette and Finishes: Enhancing Visual Appeal

The color palette plays a significant role in the overall ambiance of the nursery. Soft pastel colors, neutrals, or nature-inspired tones are often preferred for their calming effect on infants. Consider using natural wood finishes to add warmth and texture to the space. Avoid overly bright or stimulating colors that might overstimulate the baby. The choice of finishes should also complement the chosen style and overall design aesthetic.

Functionality and Storage: Optimizing Space and Organization

Functionality is crucial in a nursery. The furniture should provide ample storage space for diapers, clothing, toys, and other baby essentials. Consider incorporating drawers, shelves, and cabinets into the design to maximize storage capacity. Choose furniture with adjustable shelves to accommodate changing needs as the child grows. A well-organized nursery can contribute to a more peaceful and manageable environment for parents.

Choosing the Right Plans: A Selection Guide

Numerous plans for baby furniture are available online and in print. When selecting a plan, carefully consider the following factors:

  • Safety Standards Compliance: Ensure the plan adheres to relevant safety standards and regulations.
  • Material Specifications: Verify that the materials specified are non-toxic and durable.
  • Construction Details: Ensure the plan provides clear and detailed instructions for construction.
  • Skill Level: Choose a plan that matches your woodworking skills and experience.
  • Tools and Equipment: Assess whether you possess the necessary tools and equipment to complete the project.

Building with Precision: Execution and Quality Control

Once you have selected your plans, meticulous execution is crucial. Precise cuts, accurate measurements, and strong joinery are essential for ensuring the safety and durability of the finished furniture. Regularly check your work against the plans to ensure accuracy and avoid errors that could compromise the structural integrity of the piece.

Precise Measurements and Cuts: Ensuring Accuracy

Accurate measurements and precise cuts are fundamental to successful furniture construction. Use appropriate measuring tools and ensure that all cuts are made with precision. Inaccurate measurements can lead to instability and potential safety hazards. Double-check all measurements before making cuts to minimize errors.

Strong Joinery Techniques: Ensuring Stability and Durability

Employ strong and reliable joinery techniques to ensure the stability and durability of the furniture. Avoid weak or unreliable joints that could easily fail under stress. Consider using techniques such as mortise and tenon joints, dowel joints, or pocket hole screws for increased strength and stability. Appropriate glue and clamping techniques are also essential for creating strong and lasting joints.

Finishing Touches: Enhancing Appearance and Protection

Once the furniture is assembled, apply appropriate finishes to enhance its appearance and protect it from damage. Use high-quality, non-toxic paints, stains, or finishes specifically designed for children's furniture. Apply multiple coats for increased durability and protection. Ensure that the finish is completely dry before allowing the child to use the furniture.

By carefully considering these aspects of design, safety, and construction, parents can create beautiful and safe nursery furniture that will be cherished for years to come. Remember that the well-being of the infant is the ultimate priority, and meticulous attention to detail is essential in ensuring the creation of a safe and nurturing environment.

Share:

Your First Woodworking Project: Simple and Fun Builds

Your First Woodworking Project: Simple and Fun Builds

So, you've caught the woodworking bug? Awesome! There's something incredibly satisfying about creating something tangible with your own two hands, especially something made of beautiful, warm wood. But where do you even begin? The world of woodworking can seem daunting at first, with all the tools, techniques, and terminology. Don't worry, I've got you covered. This guide is all about getting you started with simple, fun projects perfect for your very first foray into this rewarding hobby.

Choosing Your First Project: Keeping it Simple

The key to a successful first woodworking project is to choose something manageable. Don't try to build a grandfather clock on your first attempt! Instead, aim for something small, relatively straightforward, and achievable. This will help build your confidence and skills without overwhelming you.

Ideas for Beginner-Friendly Projects:

  • A simple cutting board: A great way to learn basic cutting, sanding, and finishing techniques. You can find plenty of free plans online.
  • A small shelf: Teaches you about measuring, cutting, assembling, and potentially using some basic joinery (like simple butt joints).
  • A birdhouse: A charming project that lets you practice various cuts and learn about assembling small pieces.
  • A wooden spoon: This requires more advanced carving skills, but if you're feeling adventurous, it's a rewarding project.
  • Coasters: A super easy project to start with and a great way to practice sanding and finishing techniques. You can even personalize them!

Remember, the goal is to have fun and learn. Don't get discouraged if your first attempt isn't perfect – it's all part of the learning process! Embrace the imperfections; they add character (and a good story to tell later!).

Gathering Your Basic Tools: Starting Small

You don't need a massive workshop to get started. For your first few projects, a few essential tools will suffice. You can always expand your collection as your skills and ambitions grow.

Essential Tools for Beginners:

  • Measuring Tape: Accurate measurements are crucial in woodworking. Get a sturdy tape measure that's easy to read.
  • Pencil: For marking your cuts and measurements.
  • Hand Saw: A good quality hand saw is versatile and useful for many projects. Consider a tenon saw for finer work.
  • Safety Glasses: Absolutely essential for protecting your eyes from flying wood chips and dust.
  • Sandpaper: Various grits (e.g., 80, 120, 220) for smoothing your project.
  • Wood Glue: A strong, reliable wood glue is vital for assembling your project.
  • Clamps: To hold pieces together while the glue dries.
  • Screwdriver (or Drill): Depending on your project, you might need a screwdriver or a drill with various bits.
  • Wood Finish (Optional): Depending on your project you might want to add a varnish, stain, or paint to protect and enhance the wood.

Start with these basics. As you progress, you can gradually add more specialized tools like a jigsaw, planer, or router. Don't feel pressured to buy everything at once!

Choosing Your Wood: Understanding the Options

The type of wood you choose can significantly impact your project's outcome. For beginners, softer woods are generally easier to work with.

Good Wood Choices for Beginners:

  • Pine: A readily available, affordable, and relatively soft wood. It's easy to cut and sand.
  • Basswood: Known for its smooth texture and even grain, making it excellent for carving and detail work.
  • Balsa Wood: Extremely soft and lightweight, ideal for model making or simple projects requiring minimal strength.

Avoid hardwoods like oak or maple for your first project, as they are much harder to work with and require more advanced tools and techniques.

Safety First: Protecting Yourself in the Workshop

Woodworking can be dangerous if proper safety precautions aren't followed. Always prioritize your safety!

Essential Safety Tips:

  • Wear safety glasses: This is non-negotiable. Eye injuries are serious and easily preventable.
  • Use clamps to secure your work: This prevents accidents caused by slipping or moving wood.
  • Keep your tools sharp: Sharp tools are less likely to slip and cause injury.
  • Work in a well-lit area: Good lighting reduces the risk of accidents.
  • Wear appropriate clothing: Avoid loose clothing or jewelry that could get caught in machinery.
  • Keep your workspace clean and organized: A cluttered workspace increases the risk of accidents.
  • Know your limits: Don't attempt projects that are beyond your skill level.

Finishing Your Project: Adding the Final Touches

Once you've assembled your project, it's time to add the finishing touches. This can involve sanding, staining, painting, or applying a protective finish.

Finishing Techniques for Beginners:

  • Sanding: Smooth out any rough edges and imperfections with sandpaper, starting with a coarser grit and gradually moving to finer grits.
  • Applying a finish: This protects your project from damage and enhances its appearance. There are many options, including varnish, polyurethane, shellac, and paint. Follow the manufacturer's instructions carefully.

Commonly Asked Questions

Q: What kind of wood should I buy for my first project?

A: For your first project, choose a softwood like pine or basswood. These are easier to work with and more forgiving for beginners.

Q: What if I make a mistake?

A: Don't worry! Everyone makes mistakes, especially when starting out. It's a learning process. Sometimes you can fix mistakes, and sometimes you have to start over. That's okay!

Q: How much will this hobby cost?

A: It depends on how much you want to invest. You can start with a basic set of hand tools and some inexpensive wood, or you can gradually expand your tool collection and try more expensive woods as your skills improve.

Q: Where can I find woodworking plans?

A: There are many free woodworking plans available online. Websites like Pinterest, Instructables, and various woodworking blogs are great resources.

Q: Do I need a workshop?

A: Not necessarily! You can start in a garage, a spare room, or even a well-lit area of your backyard (weather permitting). As you grow, you might consider a dedicated workshop, but starting small is perfectly fine.

So there you have it! Your journey into the wonderful world of woodworking is just beginning. Remember to have fun, be patient with yourself, and enjoy the process of creating something beautiful and lasting with your own hands. Happy woodworking!

Share:

How-to Woodworking Projects for Mastering New Techniques

How-to Woodworking Projects for Mastering New Techniques

Stepping into the world of woodworking can feel daunting, but with the right approach and a carefully selected series of projects, you can quickly build your skills and confidence. This article outlines several projects designed to teach specific techniques, progressing from beginner-friendly to more advanced challenges. Each project focuses on a key skill, allowing you to master one technique before moving on to the next, building a strong foundation for future, more complex creations. Prepare to transform raw lumber into beautiful, functional pieces while honing your woodworking prowess!

Beginner: The Simple Shelf – Mastering Basic Cuts and Assembly

Begin your woodworking journey with a project that emphasizes accuracy and precision: a simple floating shelf. This project focuses on mastering straight cuts using a miter saw or hand saw, and practicing accurate measuring and assembly. Start by selecting a sturdy piece of wood – pine or fir work well. Measure twice, cut once is the golden rule here. Don't rush; precise cuts make all the difference in a clean, professional finish. Use a clamp to secure your work piece while cutting. After cutting the shelf to your desired size, carefully sand the edges to remove any splinters or rough patches. For the mounting brackets, you can choose simple L-brackets or create your own using more advanced techniques later. Finally, carefully attach the shelf to the wall using appropriate screws and wall anchors, ensuring it's level and securely fastened.

Skills Gained:

  • Accurate measuring and cutting
  • Use of a miter saw or hand saw
  • Basic sanding techniques
  • Simple assembly and attachment

Intermediate: The Wooden Box – Exploring Joints and Finishing

Once you've mastered basic cuts, it's time to tackle joints. A simple wooden box offers a fantastic opportunity to practice various joinery techniques such as rabbet joints, dado joints, or even a simple butt joint reinforced with glue and screws. Choose your preferred method based on your comfort level and the tools at your disposal. This project also introduces you to the world of wood finishing. Experiment with different stains and sealants to achieve the desired look and protect your box from moisture and wear. Remember to sand thoroughly between coats for a smooth, even finish. This project teaches you to create a more complex structure and allows you to explore the aesthetic possibilities of woodworking.

Skills Gained:

  • Advanced cutting techniques (rabbeting, dadoes)
  • Wood joint construction
  • Wood finishing techniques (staining, sealing)
  • Careful attention to detail and precision

Advanced: The Simple Chair – Curved Cuts and Complex Assembly

Ready for a significant challenge? Building a simple chair introduces you to more complex joinery and curved cuts. You'll need to utilize a variety of tools, including a jigsaw or bandsaw for curved cuts and potentially a router for shaping. Consider a design that incorporates mortise and tenon joints, showcasing your mastery of joinery. Accurately cutting the legs and seat to the correct angles requires patience and precision, but the satisfaction of crafting a functional and beautiful chair is unparalleled. Remember to plan carefully, creating detailed drawings and templates to ensure accuracy. This project will test your skills in every aspect of woodworking.

Skills Gained:

  • Advanced joinery (mortise and tenon)
  • Use of a jigsaw or bandsaw for curved cuts
  • Complex assembly techniques
  • Planning and design skills

By tackling these projects sequentially, you'll build a strong foundation in woodworking, progressing from simple techniques to more advanced skills. Remember safety first, always wear appropriate safety gear, and enjoy the rewarding process of transforming wood into beautiful and functional creations. Happy woodworking!

Share:

Create Custom 4 Furniture Pieces with These Comprehensive Plans

Unleash Your Inner Craftsperson: Four Custom Furniture Projects You Can Build!

Hey there, fellow furniture fanatics! Are you tired of the same old mass-produced stuff? Do you dream of owning unique, handcrafted pieces that reflect your personality and style? Well, grab your tools and let's dive into four amazing furniture projects you can build yourself! These aren't your grandma's wobbly end tables, either; these are seriously stylish, functional pieces you'll be proud to show off. We're going to go deep, covering everything from materials to assembly, so get ready for a fun and rewarding journey!

1. The Modern Farmhouse Coffee Table

This coffee table strikes a perfect balance between rustic charm and sleek modern design. It's the kind of piece that would look equally at home in a cozy cabin or a minimalist apartment. Think reclaimed wood top, sturdy metal hairpin legs – the epitome of effortless cool.

Materials You'll Need:

  • One large piece of reclaimed wood (around 48" x 24" – adjust to your desired size). Consider checking local salvage yards or lumber mills for unique options! You might even have some old planks lying around!
  • Four metal hairpin legs (16"-18" tall). You can find these online or at many home improvement stores.
  • Wood screws (appropriate size for your wood and legs).
  • Wood glue.
  • Sandpaper (various grits).
  • Wood stain or paint (optional, depending on your desired look).
  • Polyurethane sealant (to protect your wood).

Construction Guide:

First, sand your reclaimed wood thoroughly to smooth out any rough edges and splinters. This step is crucial for a professional-looking finish. Don't skimp on the sanding! Once smooth, consider staining or painting the wood to match your aesthetic. Let it dry completely. Next, attach the hairpin legs to the underside of the tabletop using wood glue and screws. Make sure the legs are evenly spaced and securely fastened. Finally, apply a few coats of polyurethane sealant to protect the wood from spills and wear and tear. And there you have it – your stunning, custom coffee table!

Pro Tip: If your reclaimed wood has imperfections, embrace them! Those knots and cracks add character and uniqueness to your table.

2. The Multi-Functional Floating Shelves

Floating shelves are a fantastic way to add storage and visual interest to any room. This project is relatively simple, even for beginners, and offers endless customization possibilities. Imagine showcasing your favorite books, plants, or decorative items in a stylish and space-saving way.

Materials You'll Need:

  • Wooden planks (length and width depend on your desired shelf size and number of shelves).
  • Heavy-duty shelf brackets (hidden brackets are recommended for a truly "floating" look).
  • Screws (appropriate size for your brackets and wall type).
  • Stud finder (essential for locating wall studs for secure mounting).
  • Level.
  • Sandpaper.
  • Wood stain or paint (optional).

Construction Guide:

Start by carefully measuring and marking your wall where you want to install the shelves. Using a stud finder, locate the wall studs – this is critical for ensuring the shelves are securely mounted and can support the weight of your items. Attach the shelf brackets to the wall studs according to the manufacturer's instructions. Ensure the brackets are level using a level. Then, carefully rest the wooden planks onto the brackets. Sand the planks before installing if desired and add stain or paint for extra personalization.

Pro Tip: For a cohesive look, use the same wood and finish as your other furniture pieces.

3. The Rustic Headboard

Transform your bedroom with a stunning custom headboard. This project lets you inject personality into your space and showcase your woodworking skills. Think reclaimed barn wood, pallet wood, or even repurposed shipping crates - the options are endless!

Materials You'll Need:

  • Wooden planks (length depends on your bed size, width is your choice).
  • Wood screws or nails.
  • Wood glue.
  • Sandpaper.
  • Wood stain or paint.
  • Wall anchors (if not attaching directly to studs).
  • Measuring tape and level.

Construction Guide:

This project involves arranging your chosen wood planks to create your headboard's design. You can go for a simple, horizontal arrangement, a more complex pattern, or even incorporate other materials. Once you've planned your design, securely fasten the planks together using wood glue and screws or nails. Sand, stain, or paint to achieve your desired look. Finally, carefully attach the headboard to your wall using wall anchors or by screwing it directly into studs.

Pro Tip: Consider adding some decorative elements, like metal accents or fabric upholstery, to elevate the design.

4. The Industrial-Style Desk

This sturdy desk is perfect for a home office or study area. It combines the functionality of a traditional desk with an edgy industrial aesthetic. Think metal piping, a solid wood top, and a minimalist design.

Materials You'll Need:

  • A wide plank of wood for the desktop.
  • Metal pipes (for legs and supports).
  • Metal pipe fittings (elbows, tees, flanges).
  • Wood screws.
  • Metal pipe thread sealant.
  • Sandpaper.
  • Wood stain or paint (optional).

Construction Guide:

This project requires a bit more precision and involves working with metal pipes. First, cut and assemble the metal pipes according to your desired desk height and leg configuration using appropriate pipe fittings and sealant. Secure the pipe legs firmly to the underside of the desktop using screws and appropriate fasteners. Sand, stain, or paint the wood to your liking. Make sure all the metal components are securely fastened for a stable and durable desk.

Pro Tip: To achieve a truly industrial look, leave the metal pipes unfinished or give them a distressed finish.

Frequently Asked Questions (FAQs)

Q: What tools do I need for these projects?

A: The specific tools will vary depending on the project, but generally, you'll need a drill, screwdriver, saw (possibly a circular saw or jigsaw), measuring tape, level, sandpaper, and possibly a paintbrush or sprayer.

Q: Where can I find reclaimed wood?

A: Check local salvage yards, lumber mills, or even Craigslist or Facebook Marketplace for reclaimed wood options. You might even find usable wood in old pallets or construction sites (always check for safety and legality before taking wood from construction sites).

Q: How can I ensure my furniture is sturdy and safe?

A: Always use appropriate fasteners and follow the instructions carefully. Pre-drill holes for screws to prevent splitting the wood. For shelves and headboards, make sure they're securely attached to wall studs for optimal support.

Q: What if I don't have woodworking experience?

A: Don't worry! Start with a simpler project, like the floating shelves. There are tons of online resources, tutorials, and videos that can guide you through the process. Take your time, and don't be afraid to ask for help.

Q: How long does it take to complete these projects?

A: The time it takes varies considerably depending on your skill level and the complexity of the project. Allow ample time for each step, and don't rush the process. A weekend is a good goal for most of these, but be prepared to take longer.

Happy building!

Share:

DIY Furniture Dolly Plans for Easy Transport of Heavy Furniture

DIY Furniture Dolly Plans for Easy Transport of Heavy Furniture

Moving heavy furniture can be a back-breaking endeavor, often resulting in strained muscles and frustration. But what if you could effortlessly glide that bulky armoire or hefty dresser across your floor? This article provides detailed plans for building your own robust and maneuverable furniture dolly, eliminating the struggle and ensuring a smooth move every time. You'll save money compared to store-bought options, and the satisfaction of building it yourself is unparalleled. Let's get started!

Choosing Your Materials: A Foundation for Success

The success of your DIY furniture dolly hinges on selecting the right materials. Prioritize durability and strength to handle the weight of your furniture. We recommend using pressure-treated lumber for its resistance to moisture and decay – a crucial feature if your dolly might encounter spills or damp conditions. Consider these options:

Lumber Selection:

  • Pressure-treated 2x4s: These form the sturdy frame of your dolly.
  • Plywood (1/2" or 3/4"): Choose a durable plywood for the platform, ensuring it's thick enough to distribute weight evenly. Consider exterior-grade plywood for added water resistance.
  • Heavy-duty casters: This is crucial! Invest in high-quality casters with a weight capacity significantly exceeding the heaviest piece of furniture you intend to move. Look for swivel casters for easy maneuvering.

Construction: Building Your Heavy-Duty Dolly

With your materials gathered, let's build! This design focuses on simplicity and robustness. Begin by assembling the frame using the 2x4s. Cut your 2x4s to the dimensions needed to create a rectangular frame slightly larger than the base of the heaviest furniture piece you will move. Use wood screws to securely join the frame, ensuring all corners are square and tight. Pre-drilling pilot holes prevents splitting the wood. Remember, strength is paramount here.

Attaching the Plywood Platform:

Next, carefully attach the plywood platform to the frame. Use wood glue and more screws to create a strong bond. Ensure the plywood is centered and flush with the frame. You might consider using countersinking screws and filling the holes with wood filler for a smoother finish.

Installing the Casters:

Finally, attach the heavy-duty casters to the corners of the frame. Consult the caster's instructions for specific attachment methods. If necessary, use washers to ensure a snug fit and prevent the casters from loosening over time. Test the dolly's maneuverability before loading any furniture.

Safety First: Tips for Using Your DIY Furniture Dolly

While your new dolly is built to handle heavy loads, safety should always be your top priority. Always lift with your legs, not your back, when loading furniture onto the dolly. Distribute the weight evenly to avoid tipping. Work with a partner whenever possible, especially for exceptionally large or heavy items. And lastly, be mindful of your surroundings – clear any obstacles from your moving path to prevent accidents.

Beyond the Basics: Enhancing Your Dolly

Once you've mastered the basic dolly design, consider these enhancements: Adding non-slip material (like rubber sheeting) to the plywood platform will prevent furniture from sliding. For extra strength, reinforce the frame with additional bracing. You can also customize your dolly's size to suit your specific needs. The possibilities are endless!

Building your own furniture dolly is a rewarding project that saves money and offers the satisfaction of crafting a practical solution to a common moving problem. Follow these steps, and you'll be moving furniture with ease in no time!

Share:

Baby Furniture Plans for Safe and Beautiful Nursery Pieces

Baby Furniture Plans for a Safe & Stunning Nursery

So, you're expecting! Congratulations! Now comes the fun (and sometimes overwhelming) part: planning the nursery. Creating a safe and beautiful space for your little one is a top priority, and building your own baby furniture can be incredibly rewarding. Not only will you save money, but you'll also have complete control over the materials, design, and finish – ensuring everything is perfectly suited to your style and baby's needs. Let's dive into some plans to get you started!

Crib Construction: Safety First!

The crib is the centerpiece of any nursery, and safety is paramount. Forget flimsy store-bought models! With a little know-how and the right plans, you can build a sturdy, beautiful crib that will last for years.

Choosing Your Wood & Materials:

Opt for solid wood like maple, cherry, or pine. These are strong, durable, and less prone to splintering than softer woods. Make sure your wood is properly dried to avoid warping later. Also, choose non-toxic finishes – water-based paints and sealants are your best bet. Avoid anything with lead or VOCs (volatile organic compounds).

Essential Crib Features:

  • Slats Spacing: Crib slats must be spaced no more than 2 3/8 inches apart to prevent your baby's head from getting stuck. This is crucial for safety.
  • Strong Joints: Use strong joinery techniques like mortise and tenon or dowel joints to create a robust structure. Avoid weak glue-only joints.
  • Mattress Support: Ensure the mattress support is firm and level. The mattress should fit snugly – no gaps larger than two fingers.
  • No Drop-Side Rails: Drop-side rails are dangerous and have been banned in many places. Stick to a stationary rail design.
  • Proper Hardware: Use high-quality screws and bolts, and always double-check everything is tightened securely.

There are plenty of free crib plans available online, but always double-check the plans against current safety standards before you begin. Consider purchasing a plan from a reputable source if you're unsure about your woodworking skills.

Changing Table: Comfort and Convenience

A changing table is a must-have for those late-night diaper changes. Building your own allows you to customize its size and features, making it perfect for your space.

Design Considerations:

Think about the height – you don't want to be bending over too much! A comfortable height for you is key. Consider adding shelves for diapers, wipes, and creams. A drawer or two can also be incredibly helpful for storing baby essentials.

Safety Features:

  • Stable Base: Ensure the changing table is wide and stable enough to prevent tipping. Securely attach it to the wall if necessary.
  • Raised Edges: A raised edge around the changing surface will help prevent your little one from rolling off.
  • Non-Slip Surface: Use a non-slip changing pad and consider adding a non-slip material to the changing table surface.

You can find many plans online that combine a changing table with a dresser or shelves for extra storage, maximizing space in your nursery.

Dresser & Storage Solutions: Organization is Key!

Baby clothes and gear can quickly accumulate! A custom-built dresser provides ample storage and a cohesive look in your nursery. You can tailor the size and number of drawers to your specific needs.

Design Options:

Consider a tall dresser with lots of drawers or a shorter one with fewer drawers and open shelving for displaying baskets or decorative items. You might even incorporate a changing top onto the dresser, saving space.

Construction Tips:

  • Dovetail Joints: For extra strength and a beautiful look, consider using dovetail joints for the drawers. This is a more advanced joinery technique, but the result is worth it.
  • Smooth Drawer Slides: Use high-quality drawer slides for smooth operation. This will be a huge benefit as you access the dresser frequently.
  • Durable Finish: Choose a durable finish that can withstand the wear and tear of daily use. Consider a sealant to protect the wood from spills and scratches.

Bookshelves and Toy Storage: A Place for Everything

Don't forget about storage for all those precious books and toys! Building your own shelves allows you to customize them to fit your space perfectly.

Creative Ideas:

Consider using different-sized shelves to accommodate various items. You could also incorporate cubbies or baskets for easy organization. For a unique touch, paint each shelf a different color or use contrasting wood tones.

Safety Considerations:

  • Secure Anchoring: If you're building tall bookshelves, secure them to the wall to prevent tipping.
  • Rounded Edges: Round off any sharp edges to prevent injuries.
  • Durable Materials: Choose strong materials that can withstand the weight of books and toys.

Finishing Touches: Personalizing Your Nursery

Once you've built your furniture, it's time to add your personal touch! This is where you can really make the nursery your own.

  • Paint: Choose a soft and calming color palette. Consider using non-toxic paints designed for children's furniture.
  • Hardware: Select knobs and pulls that complement your overall style. You can find beautiful options at craft stores or online.
  • Decor: Add personalized touches like artwork, wall decals, and textiles to create a cozy and inviting atmosphere.

Commonly Asked Questions

Q: What tools do I need to build baby furniture?

A: You'll need basic woodworking tools such as a saw, drill, sander, measuring tape, and clamps. The specific tools will depend on the project and the plans you're using. Consider renting tools if you don't own them.

Q: How much time does it take to build baby furniture?

A: The time required depends on the complexity of the project and your woodworking experience. A simple project might take a weekend, while a more complex one could take several weeks.

Q: Are there safety certifications for homemade baby furniture?

A: While there aren't specific certifications for homemade furniture, it's essential to adhere to all relevant safety standards, such as those related to slat spacing and material safety. Always research and follow reputable plans.

Q: Where can I find plans for baby furniture?

A: Many free and paid plans are available online, from websites specializing in woodworking plans to individual blogs and tutorials. Be sure to thoroughly vet your sources and always prioritize safety.

Building your own baby furniture is a rewarding experience that allows you to create a safe, beautiful, and personalized nursery for your little one. Remember to prioritize safety above all else, and enjoy the process!

Share:

Search This Blog

Powered by Blogger.

Recent Posts

Theme Support